
A missing tooth can affect more than just the appearance of your smile. Depending on its location, it may also affect chewing, speech and the way your remaining teeth come together.
One treatment option for replacing a missing tooth is a zirconia dental bridge. A traditional fixed bridge uses the teeth next to the missing tooth as supporting teeth, while an artificial tooth, known as a pontic, fills the space.
Zirconia is a high-strength ceramic material that can be used to fabricate fixed dental restorations. Modern digital workflows allow zirconia bridges to be designed using CAD/CAM technology before the restoration is milled and sintered to its final form.
If you are searching for a bridge in Ipoh, understanding what happens at each appointment can make the treatment process much easier to understand.
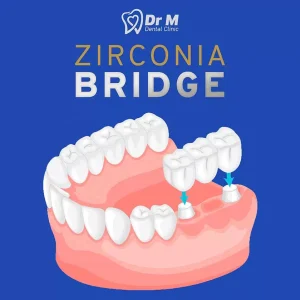
What Is a Zirconia Dental Bridge?
A zirconia bridge is a fixed dental restoration made using zirconium oxide ceramic.
A conventional bridge generally consists of:
- Abutment crowns – restorations placed over the supporting teeth
- Pontic – the artificial tooth that replaces the missing tooth
- Connectors – the areas joining the crowns and pontic together
Unlike a removable denture, a conventional fixed bridge is cemented onto the supporting teeth and is not intended to be removed by the patient.
Zirconia is popular because it combines high strength with a tooth-coloured appearance. Depending on the clinical situation, different types of zirconia and different bridge designs may be appropriate.
However, zirconia is not automatically suitable for every missing-tooth situation. The dentist needs to assess the supporting teeth, gums, bite, available space and the number and position of missing teeth before recommending a bridge.

Step 1: Initial Consultation and Assessment
The first step is a thorough dental examination.
The dentist will assess:
- The missing tooth or teeth
- The condition of the neighbouring teeth
- Existing fillings, crowns or root canal treatments
- Gum and periodontal health
- Tooth mobility
- The patient’s bite and occlusion
- Available space for the replacement tooth
- The shape and condition of the gum and bone around the missing tooth
- Oral hygiene
- Any signs of tooth grinding or excessive biting forces
Dental X-rays may also be taken when necessary to assess the supporting teeth and surrounding structures.
This step is particularly important because the supporting teeth have to withstand the forces transmitted through the bridge. A bridge is only as predictable as the foundation supporting it.
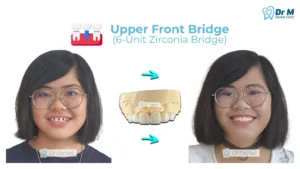
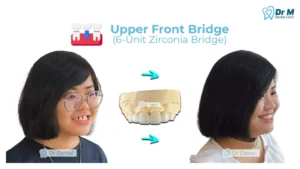
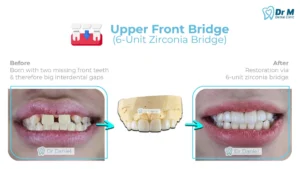
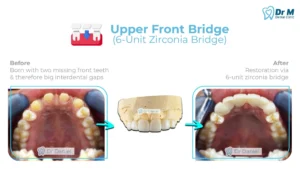
Step 2: Discussing the Treatment Options
After assessment, the dentist will explain whether a bridge is suitable and discuss alternative options where appropriate.
Depending on the case, tooth replacement options may include:
- Zirconia fixed dental bridge
- Other types of fixed bridges
- Dental implant
- Removable partial denture
- Leaving the space untreated in selected situations
There is no single treatment that is ideal for every patient.
For example, an implant may be considered when the neighbouring teeth are healthy and do not require crowns. On the other hand, a bridge may be particularly useful when the adjacent teeth already require substantial restorations.
The final recommendation depends on the individual clinical situation.
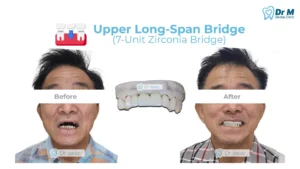


Step 3: Shade and Smile Assessment
For visible teeth, the appearance of the final bridge is carefully considered.
The dentist may assess:
- Tooth colour
- Tooth shape
- Tooth size
- Smile line
- Midline
- The shape of the neighbouring teeth
- The position of the missing tooth
- Gum contours
A shade may be selected before tooth preparation, particularly when matching the restoration to the existing teeth.
For patients replacing front teeth, the design process may involve additional consideration of tooth proportions, translucency and the relationship between the bridge and surrounding teeth.

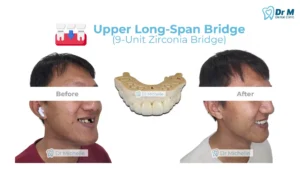
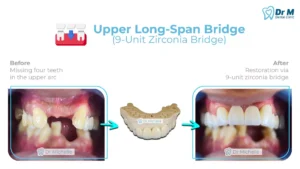
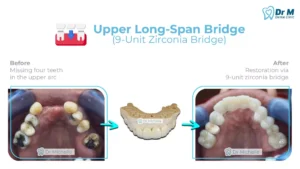
Step 4: Preparing the Supporting Teeth
For a conventional fixed bridge, the teeth supporting the bridge are called the abutment teeth.
The dentist carefully prepares these teeth to create sufficient space for the restoration while preserving as much healthy tooth structure as reasonably possible.
The preparation needs to provide:
- Adequate space for the zirconia
- A suitable finish line
- Appropriate taper
- Adequate retention and resistance
- Smooth surfaces that can be accurately scanned or recorded
The quality of tooth preparation is important because it directly affects the accuracy and fit of the final restoration. Research evaluating zirconia crown and fixed dental prosthesis preparations has highlighted the importance of preparation geometry and finish-line design.
Local anaesthetic is normally used when necessary to keep the procedure comfortable.
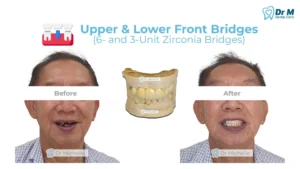
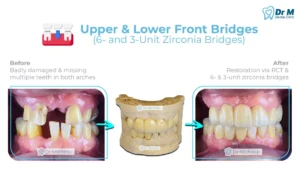
Step 5: Digital Scan or Dental Impression
Once the teeth have been prepared, the dentist records the prepared teeth and surrounding structures.
Depending on the clinic and case, this may be done using:
- An intraoral digital scanner
- Conventional dental impressions
- A combination of digital and conventional records
A digital scan can capture the prepared teeth, neighbouring teeth and opposing teeth. The bite relationship is also recorded.
Accurate records are essential because the laboratory uses this information to design the bridge.
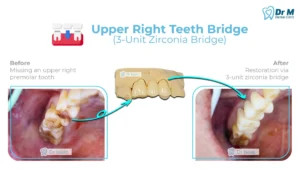
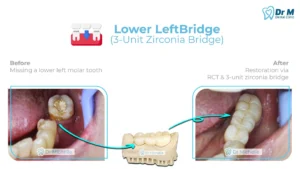
Step 6: Temporary Bridge
Because the definitive zirconia bridge usually requires laboratory fabrication, a temporary restoration may be placed while the permanent bridge is being made.
The temporary bridge helps:
- Protect the prepared teeth
- Reduce sensitivity
- Maintain the appearance of the smile
- Allow the patient to chew more comfortably
- Maintain the position of the teeth
- Provide an interim replacement for the missing tooth
Patients are generally advised to be careful with very sticky or excessively hard foods while wearing a temporary bridge.
If the temporary restoration becomes loose or comes off, contact the dental clinic rather than attempting to permanently reattach it yourself.
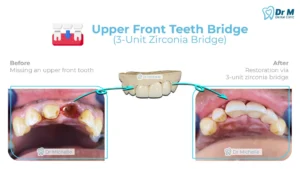
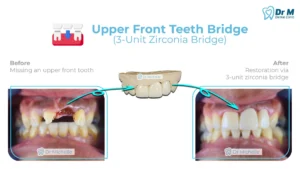
Step 7: Digital Design of the Zirconia Bridge
The dental laboratory uses the digital scan or impression to design the bridge using CAD, or computer-aided design.
The design includes:
- The shape of each supporting crown
- The pontic
- Connectors
- Contacts with neighbouring teeth
- Occlusion
- Overall tooth proportions
- Cleaning access around the bridge
The dentist and laboratory need to consider both aesthetics and function.
The pontic should replace the missing tooth while allowing the patient to maintain good oral hygiene around and underneath the bridge.
Modern zirconia workflows can involve digital scanning, computer-aided design, milling, sintering and post-processing.
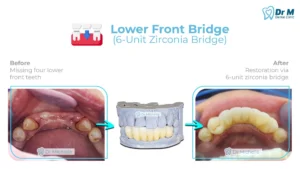
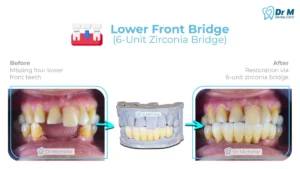
Step 8: Milling the Zirconia
After the bridge has been digitally designed, the design is transferred to a milling machine.
The bridge is milled from a zirconia block or disc.
At this stage, the restoration is larger and softer than its final form because the zirconia will undergo a subsequent sintering process.
The milling process allows the laboratory to reproduce the digitally designed shape with high precision.
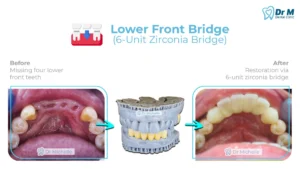
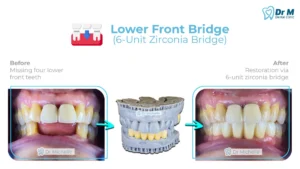
Step 9: Sintering the Zirconia
The milled zirconia bridge is placed into a specialised furnace for sintering.
During sintering, the zirconia is heated according to the manufacturer’s specified protocol. The material becomes denser and reaches its final dimensions and mechanical properties.
This is an important part of the manufacturing process because the restoration must be designed with the dimensional changes associated with sintering taken into account.
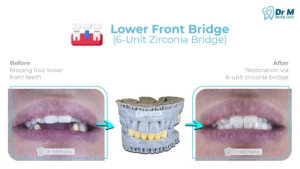
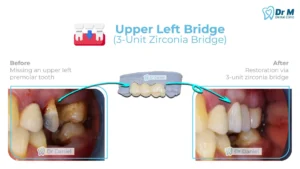
Step 10: Finishing, Characterisation and Polishing
After sintering, the laboratory performs the necessary finishing procedures.
Depending on the type of zirconia and the desired appearance, this may include:
- Adjusting the contours
- Refining the anatomy
- Staining
- Glazing
- Polishing
- Adding ceramic layers in selected cases
The final surface should be appropriately finished and polished, particularly in areas that contact opposing teeth.
Modern full-contour zirconia workflows place considerable emphasis on appropriate surface finishing and polishing.
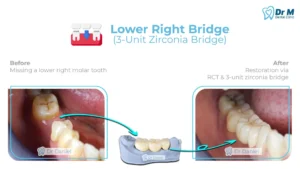
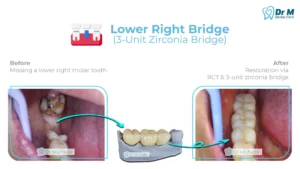
Step 11: Try-In Appointment
When the zirconia bridge is ready, it is placed in the patient’s mouth for assessment.
The dentist checks several aspects before final cementation.
Fit
The margins of the bridge are examined to ensure that the restoration fits appropriately around the prepared teeth.
Contacts
The contact points with neighbouring teeth are checked.
Contacts that are too tight or too loose may need adjustment.
Bite
The dentist checks how the bridge contacts the opposing teeth during normal biting and movements.
Appearance
For visible teeth, the dentist evaluates:
- Tooth colour
- Shape
- Proportion
- Smile appearance
- Relationship with neighbouring teeth
If adjustments are required, they are performed before final cementation.
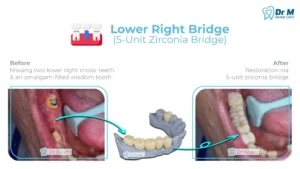
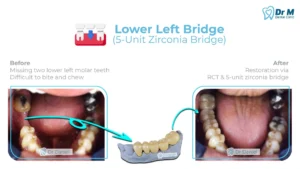
Step 12: Preparing the Zirconia and Teeth for Cementation
Before the bridge is permanently cemented, both the restoration and supporting teeth need to be appropriately prepared.
The exact cementation protocol depends on the zirconia material, restoration design, preparation geometry and cement selected by the dentist.
For zirconia, surface treatment and appropriate primers or bonding protocols can be important for achieving a reliable bond when adhesive cementation is indicated. Evidence-based zirconia bonding protocols commonly involve mechanical surface treatment together with an appropriate zirconia primer, particularly when resin bonding is required.
The bridge must also be kept clean and appropriately isolated during cementation.
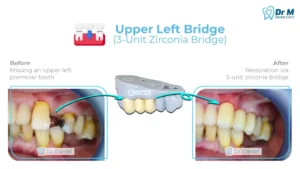
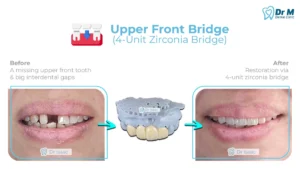
Step 13: Final Cementation
Once the dentist is satisfied with the fit, contacts, appearance and bite, the bridge is cemented onto the supporting teeth.
The cement is placed according to the selected cementation protocol, and the bridge is carefully seated into position.
Excess cement is removed around the margins and between the teeth.
The dentist then checks the bite again after cementation.
This final step is important because any remaining cement around the gums can interfere with oral hygiene, while an inappropriate bite may place unnecessary forces on the restoration.
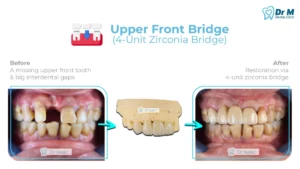
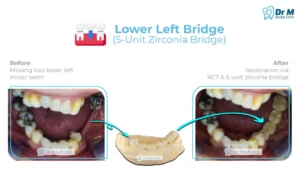
Step 14: Final Bite and Comfort Check
After cementation, the dentist performs a final examination.
The dentist checks:
- Bite
- Contacts
- Margins
- Bridge stability
- Gum areas around the restoration
- Patient comfort
Minor adjustments may be made if necessary.
The patient is also shown how to clean underneath and around the bridge.
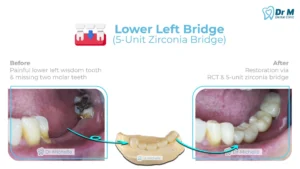
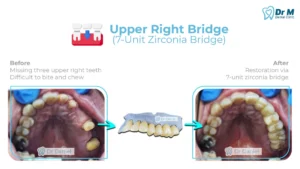
Step 15: Caring for Your Zirconia Bridge
A zirconia bridge is not maintenance-free.
Good oral hygiene remains essential.
Patients should:
- Brush twice daily with fluoride toothpaste
- Clean around the margins of the bridge
- Clean underneath the pontic
- Use floss or specialised flossing aids as recommended
- Attend regular dental check-ups
- Avoid using the bridge to bite extremely hard objects
- Inform the dentist if the bridge becomes loose, damaged or uncomfortable
Cleaning underneath the pontic is especially important because food and plaque can accumulate in this area.
Your dentist or dental hygienist can demonstrate the most suitable cleaning method for your particular bridge design.
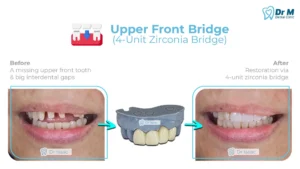
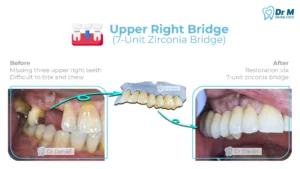
How Long Does a Zirconia Bridge Take?
The exact treatment time varies depending on the number of teeth involved, the condition of the supporting teeth and the laboratory workflow.
A straightforward case may require several appointments:
- Consultation and assessment
- Tooth preparation and scan/impression
- Temporary bridge placement
- Bridge try-in
- Final cementation
Additional appointments may be necessary if the supporting teeth require treatment such as fillings, root canal treatment, periodontal treatment or other procedures before the bridge can be completed.
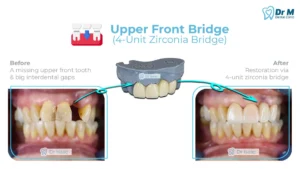
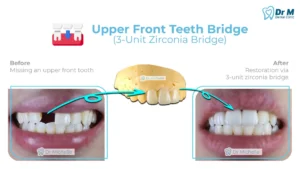
Is a Zirconia Bridge Suitable for Everyone?
No.
A zirconia bridge may not be appropriate when the supporting teeth have inadequate strength, poor periodontal support, insufficient tooth structure or an unfavourable bite.
Patients who grind or clench their teeth may also require additional assessment because excessive forces can affect the long-term performance of fixed dental restorations.
The number and position of missing teeth also matter. Not every gap can or should be restored with a conventional bridge.
A proper examination is therefore necessary before deciding whether a zirconia bridge is appropriate.
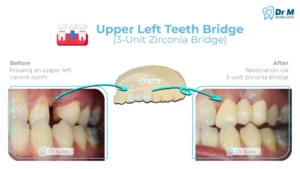
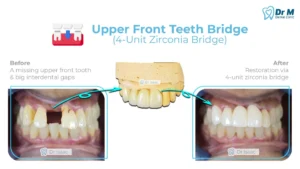
Zirconia Bridge vs Dental Implant
Both bridges and implants can replace missing teeth, but they work differently.
A conventional bridge uses neighbouring teeth as support. A dental implant is placed into the jawbone and can support a crown or bridge without relying on adjacent natural teeth in the same way.
The best option depends on factors such as:
- Condition of the neighbouring teeth
- Bone volume
- Gum health
- Number of missing teeth
- Bite
- Oral hygiene
- Treatment preferences
- Budget
- Overall dental health
Your dentist can explain the advantages and limitations of each option after examining your teeth.
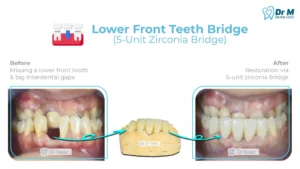
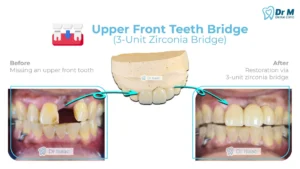
Why Choose Zirconia for a Dental Bridge?
Zirconia has become an important material in modern fixed prosthodontics because of its combination of strength, aesthetics and biocompatibility. Zirconia-based fixed bridges have also been clinically evaluated over several years, although outcomes depend on case selection, bridge design, material and clinical technique.
Potential advantages include:
- Tooth-coloured appearance
- High mechanical strength
- Metal-free ceramic material
- Digital CAD/CAM fabrication
- Ability to create natural-looking tooth anatomy
- Suitable for selected anterior and posterior cases
However, the material alone does not determine the success of a bridge. Proper diagnosis, tooth preparation, bridge design, cementation, bite management and oral hygiene are all important.
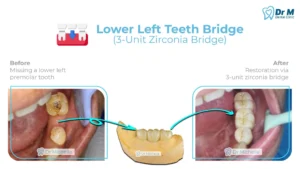
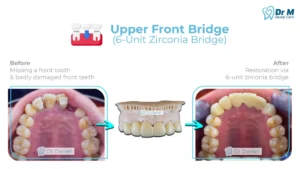
Looking for a Bridge in Ipoh?
If you are considering a zirconia bridge in Ipoh, the first step is a dental examination to determine whether a bridge is suitable for your particular situation.
At Dr M Dental Clinic Ipoh, we assess the condition of the missing tooth area and supporting teeth before recommending a treatment option. We can discuss zirconia bridges as well as other possible tooth replacement options based on your individual dental needs.
A missing tooth does not necessarily mean that you need to choose the same treatment as someone else. The most suitable solution depends on the health of your teeth, gums, bite and overall oral condition.
If you would like to know whether a zirconia bridge is suitable for you, arrange a consultation with our dental team in Ipoh.
Dr M Dental Clinic Ipoh
Opening Hours: Every day, 9 AM – 6 PM
Including Saturdays, Sundays & Public Holidays