
What Is a Composite Dental Filling?
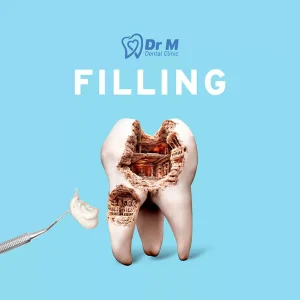
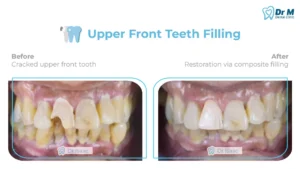
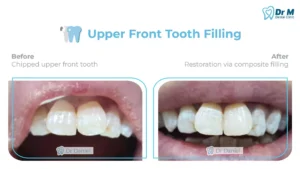
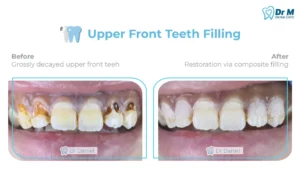
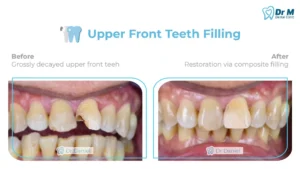
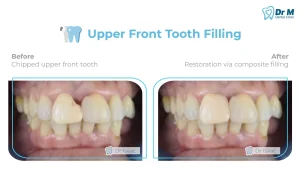
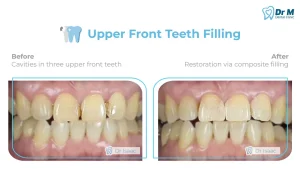
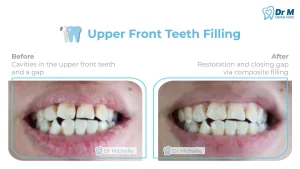
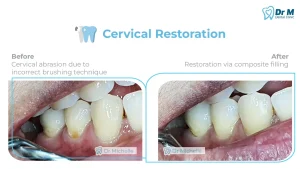
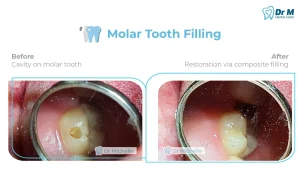
A composite dental filling is a tooth-coloured restoration used to repair a tooth affected by decay, fracture, wear or a small defect. Composite resin can be bonded directly to the tooth, allowing the dentist to restore both the function and appearance of the tooth.
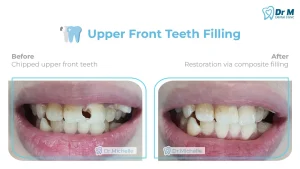
Unlike traditional metal-coloured fillings, composite fillings can be closely matched to the natural colour of your teeth. They can therefore be particularly useful when restoring visible teeth.
A composite filling is not simply a matter of placing “white material” into a hole. A successful restoration involves several carefully controlled steps, including removing damaged tooth structure, controlling moisture, preparing the tooth surface, applying an adhesive, placing composite resin and carefully finishing the restoration.
Modern composite restorations commonly rely on adhesive bonding and light curing. Proper curing is important because the composite needs to receive sufficient light energy to polymerise correctly.
When Might You Need a Composite Filling?
A dentist may recommend a composite filling when a tooth has:
- Dental decay or a cavity
- A small fractured or chipped area
- A worn portion of the tooth
- An old filling that requires replacement
- A small defect that can be restored conservatively
- A cosmetic defect that can appropriately be treated with composite resin
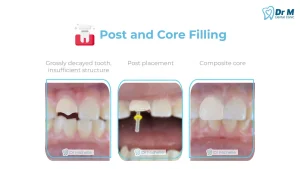
However, not every damaged tooth is suitable for a simple filling. If a tooth has extensive structural damage, a large crack or significant loss of tooth structure, another type of restoration may be more appropriate.

Step 1: Dental Examination and Diagnosis
The first step is to examine the tooth and determine why a restoration is needed.
Your dentist may examine:
- The visible tooth structure
- The surrounding gums
- The bite and contact with neighbouring teeth
- Signs of decay
- Existing fillings or restorations
- Symptoms such as sensitivity or pain
Dental X-rays may also be recommended when decay is suspected between teeth or when the extent of the problem cannot be determined clinically.
The purpose of this stage is not simply to identify a “hole”, but to determine how much healthy tooth structure remains and what type of treatment is appropriate.

Step 2: Selecting the Composite Shade
For tooth-coloured restorations, shade selection may be performed before the tooth becomes dehydrated during treatment.
The dentist selects a composite shade that blends with the surrounding natural tooth structure. For visible teeth, additional attention may be given to translucency, opacity and the different layers of the natural tooth.
For some aesthetic restorations, multiple composite shades may be used to reproduce the appearance of natural dentine and enamel.


Step 3: Local Anaesthesia When Necessary
Depending on the location and depth of the decay, local anaesthetic may be administered.
The purpose is to make the procedure comfortable while allowing the dentist to work safely and precisely.
Small and shallow restorations may sometimes require little or no anaesthesia, but this depends on the individual tooth and the clinical situation.

Step 4: Isolating the Tooth
Moisture control is one of the important parts of adhesive dentistry.
The dentist may use cotton rolls, suction and other isolation techniques. In suitable cases, a rubber dam may also be used.
Keeping saliva and moisture away from the treatment area helps the dentist maintain a clean and controlled bonding surface. Good isolation is particularly important because contamination of the bonding surface can compromise adhesion.

Step 5: Removing Tooth Decay
The dentist carefully removes the decayed or weakened tooth structure using dental instruments.
The objective is to remove infected or unsuitable tooth structure while preserving as much healthy tooth structure as possible.
The amount of tooth preparation depends on the size and location of the cavity. A small cavity may require only a relatively conservative preparation.
After the decay has been removed, the dentist checks the preparation to ensure that the tooth is ready for restoration.


Step 6: Cleaning and Preparing the Tooth
The prepared tooth is cleaned and rinsed.
The dentist then prepares the enamel and dentine according to the selected adhesive system.
Different modern bonding systems are available. Some use a separate phosphoric-acid etching step, while universal adhesives can be used with different bonding approaches depending on the clinical situation and manufacturer’s instructions.
Step 7: Etching the Tooth Surface
When an etch-and-rinse or selective-etch technique is used, phosphoric acid etching is applied to the appropriate tooth surfaces.
Etching creates microscopic surface changes that help the bonding material interact with the tooth structure.
The exact etching time and area depend on the adhesive system and clinical technique. The material is then rinsed away and the tooth surface is prepared for bonding.
Importantly, not every composite filling uses exactly the same etching protocol. Modern adhesive systems include total-etch, selective-etch and self-etch approaches.
Step 8: Applying the Bonding Agent
A bonding or adhesive agent is applied to the prepared tooth surface.
The adhesive penetrates and interacts with the conditioned tooth structure, creating the interface between the tooth and composite resin.
The dentist carefully applies the adhesive, controls its thickness and uses air as required by the manufacturer’s instructions.
The adhesive is then light-cured when required.
This bonding stage is one of the key factors that allows composite resin to adhere to the tooth.


Step 9: Using a Matrix and Wedge When Required
If the filling involves the side of a tooth, the dentist may use a matrix band and wedge.
These help:
- Recreate the missing tooth wall
- Prevent composite from sticking to the neighbouring tooth
- Establish a proper contact point
- Shape the restoration correctly
For restorations between back teeth, sectional matrix systems may be particularly useful for creating an appropriate anatomical contact and contour. Evidence-based guidance supports the use of anatomically appropriate matrix systems in many direct composite restorations.


Step 10: Placing the Composite Resin
The composite resin is carefully placed into the prepared tooth.
Depending on the material and clinical situation, the dentist may place the composite in small increments rather than filling the entire cavity at once.
Incremental placement allows the dentist to adapt the material carefully to the cavity walls and build the tooth’s anatomy step by step.
For deeper restorations, incremental placement can also help with adequate polymerisation and control of the restoration.


Step 11: Light Curing the Composite
A dental curing light is used to harden the composite resin.
The curing light activates the photoinitiator within the composite, causing the resin to polymerise and become solid.
Each layer may need to be cured according to the material manufacturer’s recommended exposure time and the clinical conditions.
The distance and angle of the curing light, the thickness of the composite layer and the output of the curing light can all influence the effectiveness of curing.
This is why simply shining the light “for a few seconds” is not necessarily sufficient. Proper curing requires the appropriate combination of material, thickness, light intensity, positioning and exposure time.


Step 12: Building the Tooth’s Shape
Once the composite has been sufficiently cured, the dentist shapes the restoration to reproduce the natural anatomy of the tooth.
For a back tooth, this may include recreating:
- Cusps
- Grooves
- Ridges
- Fissures
- Marginal ridges
For a front tooth, the dentist may focus on:
- Tooth contour
- Incisal edge
- Line angles
- Surface texture
- Translucency and appearance
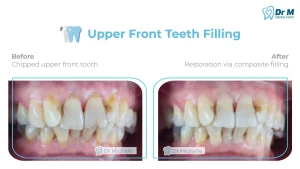
The goal is not simply to fill the cavity, but to restore the tooth as naturally and functionally as possible.

Step 13: Finishing and Polishing
The dentist carefully removes excess composite and smooths the restoration.
Finishing helps refine the shape and margins, while polishing creates a smoother surface.
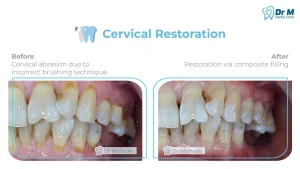
A properly finished and polished composite restoration can provide a more natural appearance and a smooth surface that is easier to keep clean. Clinical guidance also supports polishing composite restorations to improve the final surface finish.

Step 14: Checking the Bite
After the filling has been completed, the dentist checks how the restored tooth contacts the opposing teeth.
You may be asked to bite down and move your teeth in different directions.
If the filling is slightly too high, it can feel uncomfortable when biting. The dentist can make small adjustments to ensure the restoration is comfortable and functions appropriately.
Checking occlusion is an important final step in composite restoration procedures.
Step 15: Final Inspection
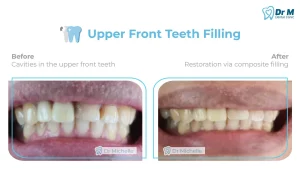
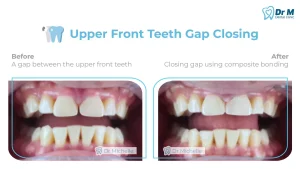
The dentist performs a final examination of the restoration.
The margins, contact areas, shape, surface and bite are checked.
If the restoration is between two teeth, floss may also be used to confirm that the contact is appropriate and that excess material has been removed.
The aim is to leave you with a restoration that is comfortable, functional, cleanable and aesthetically integrated with the surrounding tooth.

How Long Does a Composite Filling Take?
The treatment time depends on the size, location and complexity of the cavity.
A small filling may be completed relatively quickly, while a larger or more complicated restoration may require more time.
Additional time may be needed when:
- The cavity is large
- The filling involves several surfaces
- The tooth is difficult to isolate
- A matrix system is required
- The restoration requires detailed aesthetic layering
- There is extensive damage that requires more complex treatment

Does a Composite Filling Hurt?
With appropriate local anaesthesia, most patients should not experience significant pain during the removal of decay.
You may feel pressure, vibration or water during the procedure.
Some teeth may experience temporary sensitivity after a filling, particularly when the restoration is deep. If sensitivity persists, worsens or is associated with significant pain, the tooth should be reassessed by a dentist.


What Should You Expect After a Composite Filling?
Your tooth may feel slightly different immediately after treatment.
If local anaesthetic was used, take care not to accidentally bite your cheek, lip or tongue until the numbness has worn off.
You may also notice temporary sensitivity to cold or pressure.
If your bite feels unusually high or uncomfortable after the numbness has disappeared, contact your dentist so the restoration can be checked and adjusted if necessary.


How Long Does a Composite Filling Last?
The lifespan of a composite filling varies from patient to patient.
Factors that can affect its longevity include:
- Size of the restoration
- Location of the tooth
- Bite forces
- Oral hygiene
- Frequency of sugar consumption
- Tooth grinding or clenching
- Quality of the original restoration
- Regular dental examinations
A filling does not make the tooth immune to future decay. Good oral hygiene, regular dental visits and appropriate dietary habits remain important.

Why Choose a Tooth-Coloured Composite Filling?
Composite fillings can provide several advantages:
- Natural-looking tooth colour
- Direct bonding to tooth structure
- Conservative preparation in suitable cases
- Ability to restore both function and appearance
- Suitable for many anterior and posterior restorations
However, composite is not automatically the best option for every tooth. Your dentist should assess the amount of remaining tooth structure, the size of the restoration and the forces placed on the tooth before recommending treatment.

Looking for Dental Filling in Ipoh?
If you are experiencing tooth sensitivity, food getting stuck between your teeth, a chipped tooth or a suspected cavity, it is worth having the tooth examined rather than waiting for the problem to become painful.
Dr M Dental Clinic Ipoh 怡保牙医牙科诊所 provides dental examinations and restorative dental treatment in Ipoh.
A dental filling is a relatively straightforward procedure when a cavity is diagnosed early. The earlier a problem is identified, the more opportunities there may be to preserve healthy tooth structure.
For patients searching for dental filling in Ipoh, a proper examination is the first step toward determining whether a composite filling is suitable for your tooth.
Dr M Dental Clinic Ipoh
Opening Hours: Every day, 9 AM – 6 PM
Including Saturdays, Sundays & Public Holidays